☑️ Adding a Job in ParcVu Desktop
Last updated 7 months ago
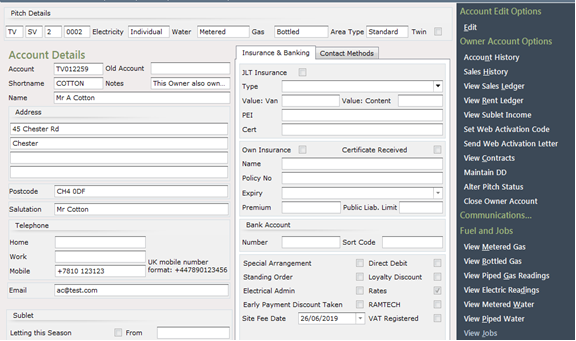
Jobs can be added via an Account (if the Holiday Home belongs to an Owner) or via the Holiday Home (if the Holiday Home is Company Owner - Hire Fleet or Staff)
In the Fuel & Jobs section on the Navigation list, select ‘View Jobs’
The Jobs list screen will be displayed, from the Navigation list on the right, select ‘Add Job (order)’.

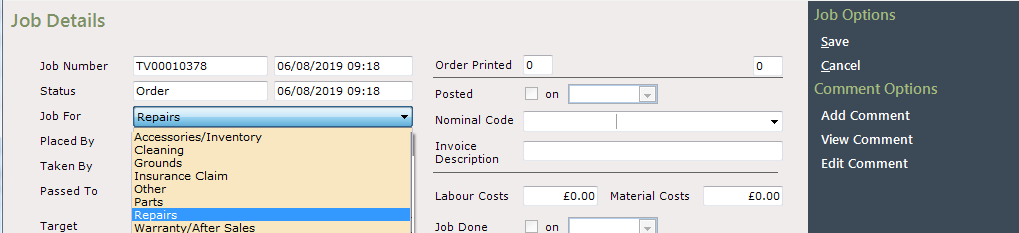
The ‘Job Details’ screen will be displayed, showing that the Job Number and date has been automatically input.
In the ‘Job For’ field on the left of the screen, select one of the ‘Job For’ options i.e. Parts, Repairs, Warranty etc., using the drop-down list at the side of the field.
If the Job type selected is Warranty/Aftersales, the system checks the Delivery date on the Van record, it also checks the Date of sale
If these dates are more than a yearago, a warning will be displayed. Read the message and select ‘Yes’ or ‘No’ as appropriate
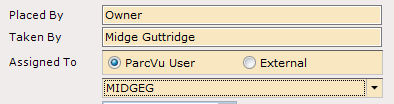
Complete the remaining highlighted fields with the ‘Placed By’, Taken By’ etc. information and then, click on the ‘Add Detail Line’ button
There is a feature to allow Users to assign the job to a specific ParcVu User, rather than using the standard free type to enter a team/team member - contact ParcVu Support to have this feature enabled
Double Click onto the line ‘type your message here’ to highlight it and then type in the Job Details.
When finished, click ‘Save’ and select the Printer to send the Job Order to

Click and the Job will be shown on the Jobs list.

Completing The Job
When the job has been completed, the job will need to be updated on the system, select ‘View Jobs’ from the ‘Owner Account Details or Van Details’ screen and the Jobs list will be displayed
All the Jobs for the Owner or Van will then be displayed
Click on the required Job in the list and select ‘View Job’ on the navigation list


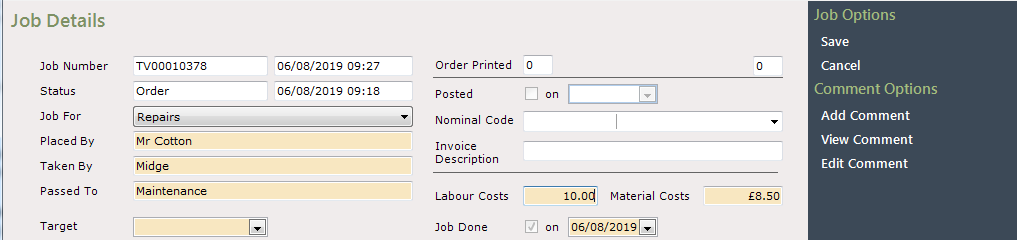
The ‘Job Details’ screen will be displayed, select ‘Mark Job as done’ from the Navigation list on the right. This will then automatically input the ‘Job Done’ flag and date
The ‘Labour Costs’ and ‘Materials Costs’ fields above the ‘Job Done’ date are where the Cost of the job to the Park values for ‘Labour and Materials’ should be entered.
NOTE: These are not visible to the customer on the Invoice.
The ‘Target Date’ is just a memo field of when the Job should be done by, it does not force the job to be done or send reminders, however, it does print out on the Job Order sheet for information.
If you require the Invoice to show the breakdown of ‘Labour’ and ‘Materials’ Charges, complete the fields at the bottom of the screen, enter the actual values to be charged to the Owner.

Alternatively, the costs can be entered as one amount against the Job in the ‘Detail’ field, double click on the ‘0.00’ in the ‘Amount’ column to highlight it, and then enter the required amount. This will then only show the ‘Total Cost’ to the Owner on the Invoice.

Do not enter values to both areas as the system will automatically add them together and the Owner will be overcharged
When finished, click ‘Save’ from the Navigation list.
For the Charge to be posted to the Owners ‘Rent Ledger Account’, select ’Site Charges Invoice’ from the Navigation list.

Select the correct ‘Nominal Code’ for the job from the highlighted drop-down list and click ‘Save’ on the navigation list.


This will automatically tick the ‘Posted’ box and enter the ‘Date’ on the screen.
Select the Printer to send the Invoice to, and the Charges will be posted to the Rent Ledger Account.

Click on the arrow twice on the top left of the screen to return to the Owner ‘Account Details’ screen.
From the Owner ‘Account details’ screen, select ‘View Rent Ledger’ from the Navigation list on the right.
The Owners Rent Ledger Account will then be displayed, showing the Job Charge.

Note: The figure appearing at the bottom of the screen in the ‘Balance’ column, is always the Owners current ‘Outstanding Balance’

Click on the arrow at the top left of the screen to return to the Owners ‘Account Details’ screen.